How To Make A Fiberglass Rapier Simulator
These simple instructions will allow you to make an inexpensive, relatively safe, and practical fiberglass rapier from common materials which can be used to practice the art of rapier fighting.
 The Shady Isle Pirate Fiberglass Rapier Simulator is based partially on documents & instructions from the SCA (Society Of Creative Anachronism), written by Steven Greenfield, and ARMA (The Association For Renaissance Martial Arts), these rapiers have been used in rapier tournaments and re-enactment groups such as the SCA. They are also an excellent alternative to steel swords for theatrical plays, and pirate re-enactment groups. The Shady Isle Pirates love these swords because they are light, easy to handle, and very safe in crowds.
PLEASE NOTE: Some SCA Kingdoms have their own rules and regulations regarding fiberglass rapiers for tournament use. In some kingdoms, these have been phased out for tournament use in favour of steel swords, but these still make great practice swords. Please check with your local shire for current regulations if you are planning to use them in a tournament.
![]()
Let's begin with a list of tools and materials you will need to have on hand:
Tools:
Hacksaw
Drill W/ Various Bits
Small file (Both Round and Flat Files Are Useful)
Sand Paper (Coarse Grit & Fine)
High temp hot glue gun
Drop Cloth / Wax Paper / Newspaper
Black sharpie marker
Ruler or Tape Measure
Small knife/razor blade/box cutter
Scissors
Lighter (If you dont have matches)
Gloves and/or Dust Mask
Eye Protection (Useful when drilling)
Paint Brush(es)
Materials:
The materials you need can be found at your local hardware store. If you live in Canada, the Shady Isle Pirates recommend visiting your local Rona/Revy or Irlybird Store (ROD'S Building Supplies)
![]()

|
QTY |
DESCRIPTION |
| 1 | Roll of 1 1 1/2" - 13/4" Industrial Strength Duct Tape |
|
1 |
Roll of 1/2" - 3/4" Fiberglass Strapping Tape |
| 1 | Vinyl Furniture End Covers (Chair Ends) as tight fitting as possible |
| 2 | Vinyl Rod Covers (Found in Shelving Section Of Hardware Store) |
|
1 |
Stainless Steel or Brass Mixing Bowl (1/2 Qt. - 1 Qt.) |
|
2 |
1/4" x 1" x 5" Pieces of Wood (cedar lathe works well) |
| 1 | Roll of Whipping Twine (Nylon Chord) |
| 2 Metres/Yards | 1/8" Chord or Rope |
| 1 | 2 1/2- 3 inch stove bolt or all-thread to fit pommel (Cabinet Knob) #8 works well |
| 1 | Pommel (wooden/ brass/ decorative cabinet knob) |
| 4 | 44-48" Solid Fiberglass Rods 1/4-3/8" (Driveway Markers / Bike Flags) |
| 1 | Pint Varnish or Shellac |
| Various | Pieces of finishing/wrapping material / paints |
| 6-8 Inches |
22 Gauge Gavlanized Wire |
Step 1:How To Make The Blade:
 The first step in making the blade is to prepare the fiberglass rods. Our rods were originally driveway markers. We got the markers from our local Rona/Revy and Irlybird hardware store. Our markers had reflectors at the top which we needed to cut off. The markers from Irlybird were a little longer (72 inches) than the ones from Revy. The Revy rods were advertised at 48" in length. Once we cut the reflectors off, they were actually 44 Inches.
If you buy bike flags, or if you have driveway markers without reflectors you may have to scrape off any reflective tape using a sharp knife or paint scraper. Also, cut off any pointy tips or anchoring pegs, trying to save as much rod as possible. If the rods came with vinyl end caps, save these for later use.
Note: Be careful when cutting fiberglass. Take care not to breathe the dust or get it in your eyes. A basic dust mask, and eye protection are a good idea, as well as, gloves to prevent any skin irritation.
Step 2: Cutting the rod pieces:
1.) First cut two rods to 44"-48" in length. In our case we used 44 inch length rods, as once the reflector was cut off, we didn't need to make any further cuts. If you need to cut your rods to length, measure a rod to about 44-48 inches in length, and mark it with a sharpie. Take the rod on a flat surface and use the hacksaw to make a straight cut. It might be a good idea to use a mitre box if you have one to get the cut straight, and make it easy. Be careful not to let the fibreglass splinter.
2.)Cut one rod to an approximate length of 26 inches in length.
Step 3: Gluing the Sword Together:
You will need a flat, level surface. A kitchen table or workbench works well, but don't get glue on it. You may want to lay out about 4 feet of wax paper, or cover the table with a drop cloth to work on. We used an old piece of drywall. Take the two long rods and lay them down parallel in front of you, next take the third shorter piece (26 inch) rod and place it in the middle of the two rods. Line the two rods up, and measure from the tip of two rods a distance of approximately 16 1/2 inches and place a mark on each of the two rods with a sharpie. Place the tip of the third rod at this mark. and then lay in the bolt/piece of all thread, so that it is flush against the end of the third rod, and sitting between the two parallel rods on either side. About 1 1/2" should be "inserted" between the two parallel rods and the bolt/all thread should extend beyond the two adjacent rods by about 1"
Figure 1: Lay the rods out straight. three in a row, with the threaded piece inserted on end.

Figure 2: Rod Tips Together
Plug in your hot glue gun and let it warm up. Now tack the base of the rods together, at the end, across the rods and bolt/all-thread horizontally, also in the middle where the third rod ends, and in the middle of the third rod across the outer two rods. Give these three tack points a moment to dry. Once the glue has dried, pull the two rods together at the tip, and add fourth strip of glue horizontally at the end to tack the tips of the rods in place.

Figure 3: Tacking the rods together
You will now start to fill in the low spots between the rods with hot glue. You will want to do this in a couple of passes. On your first pass be sure to try and force the glue down into the crack between the rods. After the first pass, check and make sure everything is flat, and not warped in any way, then do your second pass.

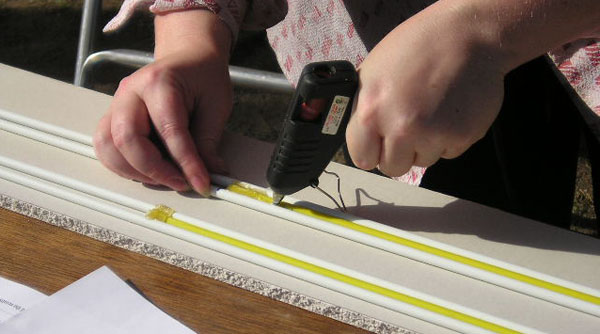
Illustration 5: Fillng The Low Spots
You will also want to put some glue bridges in the foible area of your blade after the rest of the blade has cooled. Be careful, you can warp your blade at this point, keep checking to make sure everything stays flat and true.

Put glue bridges in the foible area of the blade
At this point you will want to spread the glue to make sure it lies flat and true. You dont want large lumps of glue, as this will make it hard for the tape to adhere, and will make for an unsightly sword. To do this, take the side of the nose cone of the hot glue gun and use it to slowly level the glue so the sides of the rapier will be flat.

Turn the blade over and repeat these steps on the other side. (Be careful not to warp the blade).

Taping the Blade:
At this point we will want to tape the blade. Start by taping with 2 winds of the 1/2 - 3/4" strapping tape horizontally at these approximate locations.

Apply the strapping tape horizontally
Now cover the blade lengthwise with the 1/2"-3/4" strapping tape, with the fibers running lengthwise vertically with the blade. Keep it as smooth as possible. Cover the entire length of the blade on both sides.

Now you are ready to cover the blade with the duct tape, it is easiet to lay the duct tape vertically on the blade. Place it over the top of the fiberglass strapping tape, and wrap it around until the whole blade is covered. The fibers in the ductape should run horizontally on the blade. This will provide a "criss-crossing" of fibers which will be very strong.


How To Make A Fiberglass Rapier Simulator - Pt. 2
Step 2: How To Make The Quillions And Hilt:
Making the Quillions (Cross Piece):
Get the two 8-inch rod pieces that you cut earlier. Find the center, by measuring a distance of 4-inches from the end. Mark off the center with a sharpie. Then on either side of the center mark, mark two more points ½ inch away from the center point. This will give you the center of the cross where the blade will go through. Now get the two 6-inch pieces you cut earlier.
Place all four pieces of the rod on the table. The two 8 inch pieces will be placed horizontal to one another with their ends matching, much like an equal sign. The two 6 inch pieces will be placed in-between the two 8 inch pieces with one end placed at the marks made to either side of the center mark on the 8 inch pieces, leaving a 1 inch gap in the middle for the blade core to be able to just fit through tightly. Then glue the cross together in the same manner as you did the blade core.

Illustration 12: Gluing the Cross Pieces Together

Illustration 13: Placing & Gluing the Cross Piece (Quillion)
Glue cross to blade
At this point you must decide where you want to place the cross of your sword. In the case of our swords, we placed the quillions (cross) 5 inches down from the back end of the blade allowing for a 5 inch grip You can adjust your handle size asa you deem necessary, 4-5 inches though is a good rule of thumb.
Once the position for the cross has been determined and marked with the black sharpie, you will then slide the cross into position and make sure it is straight, then glue it to the blade on both the top and the bottom of the cross. Once the glue hardens, take a couple of strips of strapping tape cut to about a ¼ inch wide and wind them around the point where the cross meets the blade in the form of an X, this helps stabilize the cross when it receives any type of an impact.
Making the bell guard
Place the stainless steel bowl upside down on a workbench and mark the center of the bottom of the bowl with the black sharpie. Then mark a line 1” long centered through the center mark on the bottom of the bowl. Like this:
-|--+--|-
Use a set punch and a hammer and center punch three positions on this line, one in the center, and one ¼ inch in from each end of the 1-inch line.
Take your electric drill with a 5/16-inch drill bit and drill three holes at the positions you placed center punches.
Now using a round file, file at the bowl until you have created a slot in the bowl that will fit over the blade of your rapier. Slide the bowl over the front of the blade with the bottom pointed towards the point, and the lip of the bowl touches the cross to form a bell guard. Mark the position on the blade where the slot in the bowl is at on the blade, and then remove the bell guard. Take some strapping tape, about a 1/2-3/4 inches wide and wrap it around the blade a few times where the slot in the bell guard stops on the rapier blade, this will protect the fiberglass from being cut by the sharp edges of the thin stainless steel. Replace the bell guard on the rapier and hot glue the lip of the bowl to the cross, then hot glue the position where the slot in the bell guard is both inside and out to the blade.
With use the bell guard will pop free from the cross if it is only held with hot glue, this in not a big problem since in can be easily fixed with a little heat from the glue gun down the road, but if you don’t like regular weapon repairs, I would also drill four holes in the lip of the bowl on either side of the cross in order to thread some stainless steel wire around the cross and through the lip of the bowl in order to tie it down and if you want then place a little hot glue over the wires, this will make the connection between the bell guard and the cross extremely strong.


Illustration 14: Wire going through the guard and reinforcing the quillions.
Note: Additional hot glue can be used to help add further strength.

Figure 15: Taping and lashing the quillions.
Next we further duct taped around the quillions and sword and placed an "X" lashing with nylon cord to help strengthen the joint, between the cross and the sword blade. We then painted over the duct tape with gold paint for a brass look. You will also want to glue the vinyl end caps firmly in place. you may wish to paint these a contrasting color.
Attach the grip
Take the two slabs of wood that are 1 inch wide by 4 inches long by ¼ inch thick and hot glue them down on either side of the rapier blade against the cross where the grip will be placed at the back of the blade. Then using a rasp and sand paper, round off the square edges of the wood so the grip is easy to hold in the hand. Then once you have sanded it to a smooth finish, for an added touch add a couple layers of shellac or varnish. We also filled the area between slabs of wood, and painted it a brass color.
From here you can either leave the grip as it is and simply screw on the pommel, or you can wrap it with leather, wire-wrap it , wrap it with tape, or for the nautical look, wrap it with a decorative rope.

Illustration 16: Sword end without the screw on pommel (cabinet knob) attached

Illustration 17: We wrapped the handle in decorative rope and "whipped" the quillions.
You could also wrap the quillions in decorative ribbon or cloth -in this picture we painted them.

Illustration 18: These quillions are wrapped in velvet ribbon, notice the tassle
How to wrap the handle
The easiest method for wrapping the handle is to use a standard sailor's whipping. You can either trim the rope at the end or leave it dangle outward for an added effect, adding either a tassle or wooden beads as above.

1. Loop the whipping line (small rope) allowing approximately 18 inches
for wrapping on the arrow side.
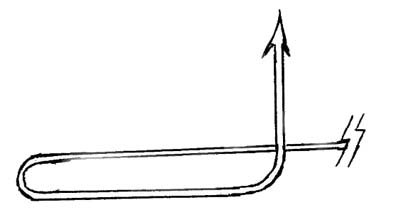
2. Loop the whipping line over itself.
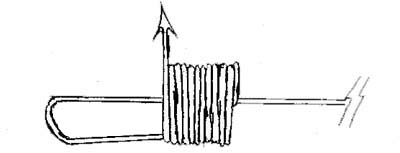
3. Wrap the whipping line over itself,
keeping the wraps as tight as possible.

4. After whipping is approximately same width as the rope being whipped,
lace whipping line through the loop.

5. Gently pull on the main end of the whipping line indicated with the break (lighting bolt)

6. When the loop is tight trim the line to 1/4 the width of the wraps that are now around the main rope.

7. Pull the main whipping line until the whipping end loop is completely buried under the wraps.

8. If you want, trim the excess whipping line, or you can leave it and attach beads,
or make a tassle. At this point the whipping is complete.
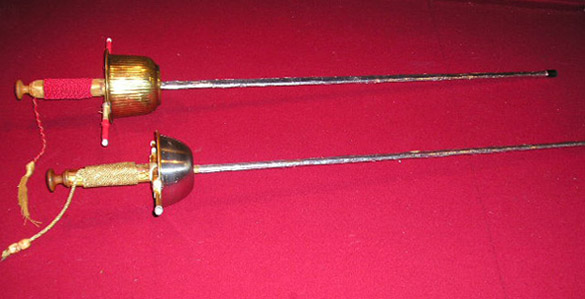
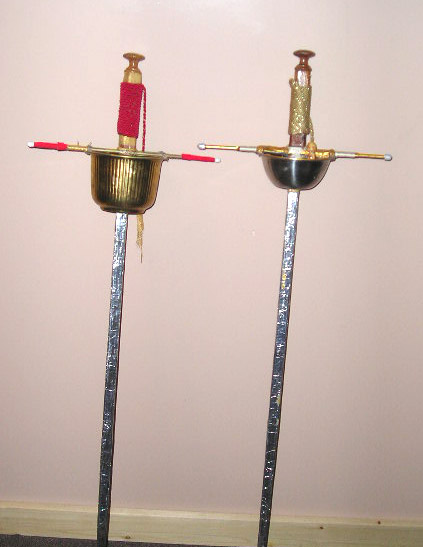
Illustration 18: The finished sword.


Steven aka "Esteban el Barbarosa de Curvo Del Rio" aka "Capt. Skippy"
and Robin "The Ruthless" Greenfield with the fibreglass rapier simulator in Westport, WA 2007.
SWORD MAKING LINKS:
For further reading on how to make fiberglass swords check out these sites:
Steven Greenfield ("Esteban el Barbarosa de Curvo del Rio")
(Author of The An-Tir Fiberglass Rapier Construction Guide, 1992-1995)
See also:The Northwest Propmakers Yahoo Group
PolyMorph Digital Photography
Basic Fiberglass Rapier How-To
(http://www.thearma.org/Practice/fiberglass-rapier-simulator.html)