


Rigging & Sails: Step 2 - Creating the Standing Rigging
Step 1: Choosing Your Materials
Once again there are a variety of materials that you can use for rigging. Obviously, this may be an area where you might want to "get creative" and experiment with different stuff. For the D4 Brig Adventure, we used three strand nylon fro the halyards and polyester for the rigging, however you could also use manilla. You would be well advised to not use polypropylene rope, as it stretches alot. In any event, to make splicing easy you may find it best to use twisted rope (we used three strand), although some braided rope can be spliced it requires the use of a "fid"
| TWISTED VS. BRAIDED CONSTRUCTION | |
|
|
Twisted Rope There are two general categories of rope construction: twisted and braided. Twisted rope is formed by coiling three strands together in the same direction. The fibers within each of the three strands must twist in the opposite direction as the strands in order to produce a balanced rope, that is, one which hangs straight and resists kinking. Twisted rope must be fused and taped on each end to prevent unraveling. |
|
|
Braided Rope Three general categories of braided construction exist: diamond braid with a core, diamond braid without a core (called hollow braid) and solid braid. Diamond braid is manufactured by weaving ends of yarn over and under, the same fashion in which the maypole dance is done. If there is a core around which the rope is braided it cannot be spliced. If no core exists, the rope is called "hollow braid". The outstanding feature of hollow braided rope is the ability to splice it. . Solid braid is very firm, round and tightly woven with a special lock-stitch construction which prevents unraveling when cut or torn. Solid braided rope stands up especially well to chafing of blocks and pulleys. This construction cannot be spliced. When the rope as well as the core are braided, the construction is know as "braid-on-braid" or "double braid". This is the strongest and most expensive of all rope. |
Polyester Rope
Polyester is one of the most popular ropes in the boating industry. It is very close to nylon in strength but stretches very little and therefore cannot absorb shock loads as well. It is equally resistant as nylon to moisture and chemicals, but is superior in resistance to abrasions and sunlight. Good for mooring, rigging and industrial plant use, it is used as fish net and bolt rope, rope sling and alongside towing hawser.
Polyester is very close to nylon in strength when a steady force is applied. . It is as equally resistant as nylon to moisture and chemicals, but is superior in resistance to abrasion and sunlight. Polyester is the most popular general purpose rope in the boating industry.


Nylon Rope:
Nylon is the strongest of all ropes in common use. When stretched it has a "memory" for returning to its original length. For this reason it is best for absorbing shock loads, as is the case when lifting or towing. Nylon lasts 4-5 times longer than natural fibers because it has good abrasion resistance and is not damaged by oil or most chemicals. Like manila, nylon has good resistance to ultraviolet deterioration from sunlight, referred to as "U.V. stability".
All of the D4 Brig Adventure's halyards are made out of nylon rope.
Manilla Rope:
Manilla is a natural fiber of the abaca plant. Unless you're a calloused shellback, hauling on a manilla line is almost sure to imbed invisible splinters in your hands. These splinters are too small to pull out with tweezers, so the only practical way of removing them is to let them fester out (ouch!).
Splinters are only an irritation, not the real problem with manilla rope. Being a natural fiber, manilla is subject to rot, especially when wet. Even when properly cared for, manilla line had a limited lifespan. Sooner or later, it would start to deteriorate.
A hard natural fiber, manila is especially resistant to sunlight. It is very popular for public utility construction and repair because it will not melt on contact with hot wires or equipment like synthetics do. It will burn, however, if the temperature is very high or if the rope is in contact with the wires/equipment for an extended period of time. Manila holds knots firmly and stretches very little. It must be stored dry to avoid mildew. Chemicals will cause it to deteriorate It is also very easy to splice.
This is a very traditional rope, and if you want a traditional look and feel, use manilla, but be prepared to replace the lines over time.
Polypropylene Rope:
Because of its light weight, polypropylene is the only rope which floats. For this reason, it is very popular for pool markers and water sports. Poly is affected by sunlight deterioration, more so than any other synthetic or natural fiber rope, but its life can be extended by storing it away from direct sunlight. Poly begins to weaken and melt at 150°F, the lowest melting point of all synthetic ropes. It is not as strong as nylon or polyester, but 2-3 times stronger than manila. Because poly is less expensive than other fibers, it is the most popular all-purpose rope for the average consumer
Polypropylene is also subject to alot of stretch, so it doesn't make a good rope for halyards, or stays. It does make a good heaving line for emergancies, and sometimes makes a good "springer" line for mooring. It is generally a good product where stretch is not a concern and light weight is a factor.
Step 2: Making the rigging:
Each end of the rigging we spliced and then whipped any loose ends, by inserting a metal "grommet" called a thimble to form the loop around both the turnbuckles and the eyes on the shrouds. You may want to also make "deadeyes" to give your boat a more traditional look. Here is some information on deadeye and turnbuckles written at the turn-of-the-centuries.
For more information on making creating dead eyes, please see the files: deadeye2.jpg, deadeye2.pdf, DeadEye.pdf in the zip archive.
The Adventure is fitted out with turnbuckles, and the Liberte has standard dead-eyes.
Wire has entirely superseded rope for standing rigging, and deadeyes and lanyards are fast giving way before the advance of the turnbuckle. An old sailor cannot help regretting the decline and fall of his profession and the growing popularity of the art of the blacksmith. So far as the rigging of ships is concerned, when wire rigging was first introduced it was thought that its rigidity would prove a fatal objection to its successful use. Science has, however, set its foot down firmly on such objections. The decree has gone forth that rigging cannot possibly be set up too taut, and the less it stretches the better.
The old argument that a yacht's standing rigging should "give" when the craft is caught in a squall, which old sea dogs were so fond of advancing, has been knocked on the head by scientific men who declare that a vessel's heeling capacity affords much more relief than the yielding quality of rigging. Thus all or nearly all of the modern immense steel sailing vessels in the East Indian and Australian trade have their steel masts stayed as rigidly as possible by means of turnbuckles, and practice seems to have demonstrated the truth of the theory. These ships encounter terrific seas and gales off the Cape of Good Hope and Cape Horn, and their masts are thus subjected to violent and sudden strains, but I have been assured by the commanders of several of these great freight carriers that they have never known their "sticks" to be imperiled by the rigidity of the rigging, and the tauter it can be set up the more secure the masts are supposed to be.
SHROUD, DEADEYE, LANYARD.
 There are, however, a number of old salts who condemn this theory as rank heresy, and go in for deadeyes and lanyards of the old-fashioned kind, and the greater the stretch between the upper and the lower deadeyes the better are they pleased. There is no doubt that turnbuckles look neater than deadeyes, and they are probably well suited for small craft. The Herreshoffs have long used them for setting up the rigging of the sloops and yawls of moderate size which they used to turn out in such numbers, and which first laid the foundation of their fame. The boat owner can please himself as to which method he may choose, and he can rely that with either his mast will be perfectly secure. Both methods are shown in the accompanying cuts.
There is one thing in connection with wire rigging that I must warn the amateur against. Beware of shod wire rigging. "Shoes" are iron plates riveted to the ends of wire rigging to receive shackle bolts. They are never reliable. Eye splices in wire never draw. "Shoes" often collapse without notice.

TURNBUCKLE
Turnbuckles are very handy appliances for setting up rigging in a hurry, whereas the same operation conducted by means of a deadeye and a lanyard takes much more time and trouble. A small craft rigged as a sloop, cutter or yawl, requires only one shroud on each side to afford lateral support to the mast, and a forestay -- which in the case of a cutter or yawl should set up at the stem head, but on a sloop is set up on the bowsprit. A simple way to fit the rigging is to splice an eye in each shroud, forming a collar sufficiently large to pass over the masthead, first covering the part that is to form the eye with canvas sewn on and painted. The starboard shroud goes over the masthead first, then the port one and last the forestay. In large yachts the lower rigging is often fitted in pairs, the bight of the shrouds being passed over the masthead and secured in the form of an eye with a stout wire seizing.
Determing Shroud/Stay Lengths & Splicing
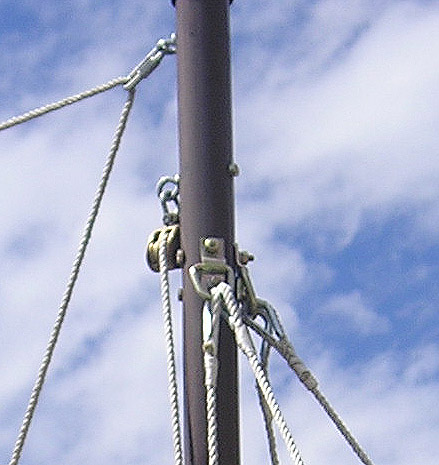
Now to create the shrouds and stays, we first attached the shrouds to the mast via an eye splice, with a metal insert called a "thimble" to prevent from chafing. In the picture below you will notice the rear mast has "loose shrouds", that is the shrouds are run down from the top of the mast where they are fixed by an eye splice. We then tie off at the turnbuckles to get the proper length and then tighten them to allow the rope to stretch. Once we let the ropes "set" for a few hours, when then mark the proper length at the bottom of the turnbuckle and finish it with an eyesplice.
 .
.
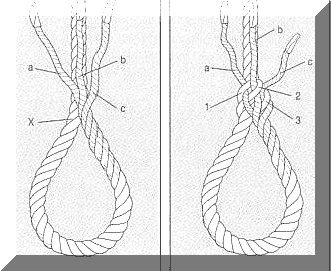
Start the eye splice by unraveling eight to ten turns of the strands of rope.
Now seal the ends of each of the three strands with tape or heat to prevent them from unraveling.
|
Next form a loop in the rope by laying the end back along the standing part. Hold the standing part away from you in the left hand with the loop toward you. The unlaid end can now be worked with the right hand. The size of the loop is determined by the point at "X" where the strands are first tucked under the standing part of the rope. Now lay the three opened strands across the standing part as shown in Illustration "A", so that the center strand "B" lies directly over and along the standing part. Left hand strand "A" leads off to the left, right hand strand "C" to the right of the standing part. Tucking the strand ends "A", "B" and "C" under three strands of the standing part is the next step. Get this right and the rest is a piece of cake! Starting with the center strand "B", Select the topmost strand of the standing part and tuck "B" under it.(right to left against the lay of the strands) Tighten but do not distort the natural lay of the strands. Next take left hand strand "A" and tuck it under strand 1(Which is left of strand 2). And then take strand "C" and tuck it under strand 3 (Which is right of strand 2). Tuck from right to left against the lay of the strands for each of these also. If all of the tucks have been made correctly, the eye splice should look like Illustration "B". The splice is completed by continuing to make at least four full tucks with each of the strands. As each added tuck is made be sure it passes over one strand of the standing part, then under the next strand above it, right to left against the lay of the strands. The completed splice should look like Illustration "C". |
Illustration "A" Illustration "B"
llustration "C"
|
Another Eye Splice Diagram

Diagram Three
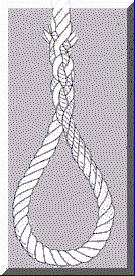
Whipping A Line
We then "whip" the area of the splice to help hold the splice in place and add a little finishing touch. We have also whipped all of the brace lines, sheets, and ratlines.
A whipping is used on the end of a line to prevent it from becoming unlaid or frayed. The steps are as follows:
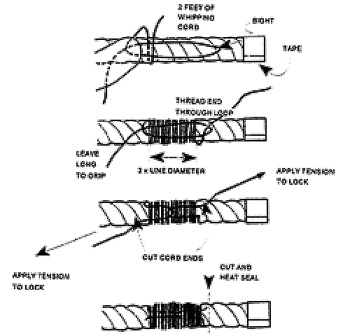
Diagram 1: Whipping A line
The basic dead-eye on the Liberte mini-brig is accomplished by cutting 2" disks with a hole cutter from a piece of 2" X 4". We used a very good grade of wood, as we didn't want knots or cracks in the wood. There is very little difference in price between the econo-stud and premium KD lumber, so in this case is pays to use better quality lumber..
You need to cut four disks per side, similarly you could simply mark out a section of the main mast material and cut disks from the mast stock, we prefer the hole saw method.
Once you have cut the disks, you need three small holes about 1/4" in diameter (you should have one hole already created by the hole saw), in a bowling ball like pattern at the bottom of the disk. Usually, the hole cutter will have left a center hole, so it is a simply matter of drilling two holes about 1/4" up from the bottom edge.
This best accomplished using a drill press, but we drilled ours with a handrill. Take care that the holes are straight. A few of ours went a "little-off" - but that is okay. The deadeye performs admirably.
At this conjecture, you will want to sand all the edges and smooth the holes. This can be accomplished by taking a round file or a rolled up piece of sand paper and running it through the holes. We sanded the outer diamter of the disk to make it smooth. If one wanted a real authentic look, you might spend some time filing the edges so they have a rounded appearance.
Now, you may want to finish the deadeye by staining it, as Ulysses did above, or simple use a light varnish. We used the minwax all in one varnish shellac for a "light-oak" look and then added another layer of protective varnish. Once your varnish has dried, you will want to run the sandpaper/file through the hole again to make sure they aren't plugged.
At this point it is just a matter of wrapping the strapping around the dead-eye, inserting a small 5/8"-7/8" shackle and closing the loop with a small screw and nut. Any excess strapping is trimmed to shape using a pair of tin snips.

The Liberte's "Dead-Eyes"


| Ratlines Pronunciation: rat´linz (Naut.) The small transverse ropes attached to the shrouds and forming the steps of a rope ladder for climbing aloft. |
Ratline is a nautical term, referring to small lengths of horizontal cord that run between the shrouds, several strong ropes that affix the top of a mast to the vessel's sides. The ratlines serve as crude ladder rungs, allowing the crew to scale the mast when necessary. In bygone days, scampering up the ratlines was a last, desperate recourse for sailors on sinking ships, at least if they were unfortunate enough to have missed out on the lifeboats. As a result, "ratline" became a synonym for "last-ditch escape route."
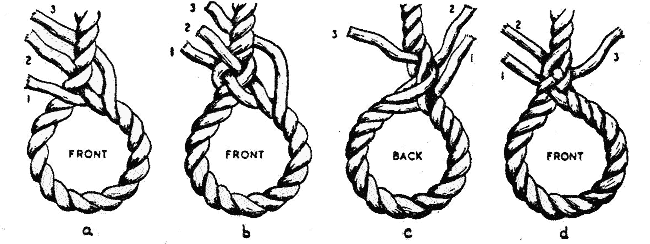
The "Ratlin" as they were later called is formed by a clove hitch. This type of knot tightens when a load is applied. In early vessels, shrouds and ratlins were covered with tar to keep them from rotting. You may want to add ratlins between the shrouds they are tied using a clove hitch.


Tying the ratlins and running the lower shrouds.

A simple clove-hitch knot attaches the ratlins

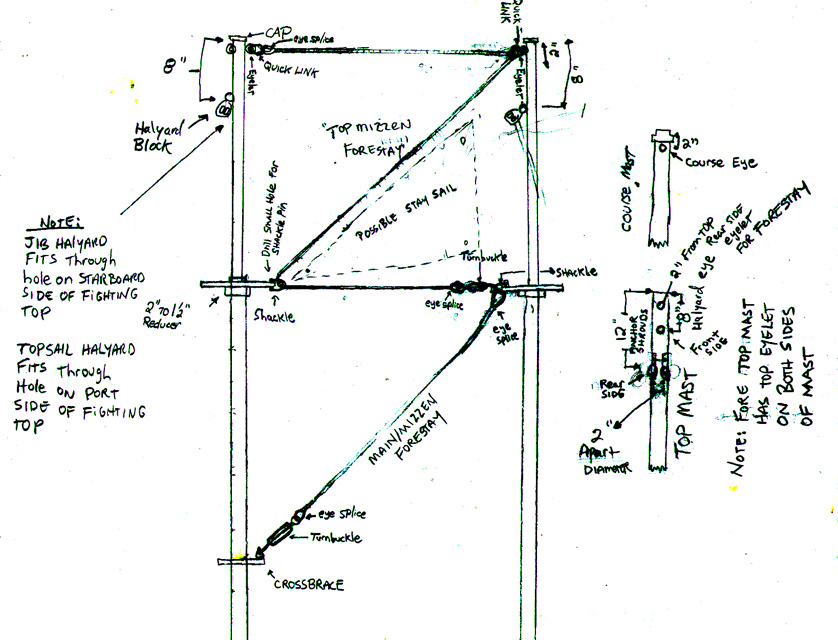
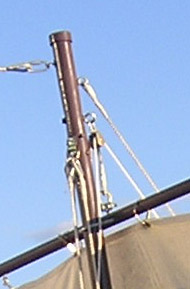
Fighting Top W/ Standing Rigging
(Notice Eye Splices & Thimbles)
|
|
|
|
Main Topmast: Rigging Positions and Anchors |